Become a sponsor

为了便捷管理 Nginx 配置文件,创建 vhosts 目录用于存放应用配置文件,在 nginx.conf 配置文件中导入 vhosts 目录,创建 cert 目录用于存放 SSL 访问证书。
# 查看路径
[root@S1 conf]# pwd
/usr/local/nginx/conf

# 查看文件
[root@S1 conf]# ll
total 68
drwxr-xr-x 2 root root  111 Jan 20 22:48 cert
-rw-r--r-- 1 root root 1077 Nov  6  2023 fastcgi.conf
-rw-r--r-- 1 root root 1077 Nov  6  2023 fastcgi.conf.default
-rw-r--r-- 1 root root 1007 Nov  6  2023 fastcgi_params
-rw-r--r-- 1 root root 1007 Nov  6  2023 fastcgi_params.default
-rw-r--r-- 1 root root 2837 Nov  6  2023 koi-utf
-rw-r--r-- 1 root root 2223 Nov  6  2023 koi-win
-rw-r--r-- 1 root root 5231 Nov  6  2023 mime.types
-rw-r--r-- 1 root root 5231 Nov  6  2023 mime.types.default
-rw-r--r-- 1 root root 2852 Nov  7  2023 nginx.conf
-rw-r--r-- 1 root root 2656 Nov  6  2023 nginx.conf.default
-rw-r--r-- 1 root root  636 Nov  6  2023 scgi_params
-rw-r--r-- 1 root root  636 Nov  6  2023 scgi_params.default
-rw-r--r-- 1 root root  664 Nov  6  2023 uwsgi_params
-rw-r--r-- 1 root root  664 Nov  6  2023 uwsgi_params.default
drwxr-xr-x 2 root root   33 Feb 27 22:20 vhosts
-rw-r--r-- 1 root root 3610 Nov  6  2023 win-utf
配置文件 nginx.conf 如下:
#user  nobody;
user  www www;
worker_processes  2;

#error_log  logs/error.log;
#error_log  logs/error.log  notice;
#error_log  logs/error.log  info;

#pid        logs/nginx.pid;


events {
    worker_connections  1024;
}


http {
    include       mime.types;
    default_type  application/octet-stream;

    #log_format  main  '$remote_addr - $remote_user [$time_local] "$request" '
    #                  '$status $body_bytes_sent "$http_referer" '
    #                  '"$http_user_agent" "$http_x_forwarded_for"';

    #access_log  logs/access.log  main;

    sendfile        on;
    #tcp_nopush     on;

    #keepalive_timeout  0;
    keepalive_timeout  65;

    client_max_body_size 100M;
    server_names_hash_max_size  512;
    server_names_hash_bucket_size  96;

    #gzip  on;

    server {
        listen       80;
        server_name  localhost;

        #charset koi8-r;

        #access_log  logs/host.access.log  main;

        location / {
            root   html;
            index  index.html index.htm;
        }

        #error_page  404              /404.html;

        # redirect server error pages to the static page /50x.html
        #
        error_page   500 502 503 504  /50x.html;
        location = /50x.html {
            root   html;
        }

        # proxy the PHP scripts to Apache listening on 127.0.0.1:80
        #
        #location ~ \.php$ {
        #    proxy_pass   http://127.0.0.1;
        #}

        # pass the PHP scripts to FastCGI server listening on 127.0.0.1:9000
        #
        #location ~ \.php$ {
        #    root           html;
        #    fastcgi_pass   127.0.0.1:9000;
        #    fastcgi_index  index.php;
        #    fastcgi_param  SCRIPT_FILENAME  /scripts$fastcgi_script_name;
        #    include        fastcgi_params;
        #}

        # deny access to .htaccess files, if Apache's document root
        # concurs with nginx's one
        #
        #location ~ /\.ht {
        #    deny  all;
        #}
    }


    # another virtual host using mix of IP-, name-, and port-based configuration
    #
    #server {
    #    listen       8000;
    #    listen       somename:8080;
    #    server_name  somename  alias  another.alias;

    #    location / {
    #        root   html;
    #        index  index.html index.htm;
    #    }
    #}


    # HTTPS server
    #
    #server {
    #    listen       443 ssl;
    #    server_name  localhost;

    #    ssl_certificate      cert.pem;
    #    ssl_certificate_key  cert.key;

    #    ssl_session_cache    shared:SSL:1m;
    #    ssl_session_timeout  5m;

    #    ssl_ciphers  HIGH:!aNULL:!MD5;
    #    ssl_prefer_server_ciphers  on;

    #    location / {
    #        root   html;
    #        index  index.html index.htm;
    #    }
    #}

    # 项目配置文件统一放vhosts目录
    include vhosts/*.conf;
}
温馨提示
/usr/local/nginx/html 目录是服务器的 Nginx 资源路径。include vhosts/*.conf; 配置用于解析导入包含在 vhosts 内的全部配置文件。创建应用 nginx 配置文件 admin.example.com.cnf 并存放至 vhosts 目录,增加以下配置;
server
{
  listen 80;
  # 实际项目部署时此处的域名需要解析已备案过的域名
  server_name admin.example.com;
  # 实际项目部署时换成自己的实际路径
  root /usr/local/nginx/html/dist;

  # 开启Gzip功能
  gzip on;
  gzip_min_length 10k;
  gzip_comp_level 9;
  gzip_types text/plain text/css application/javascript application/x-javascript text/javascript application/xml;
  gzip_vary on;
  gzip_disable "MSIE [1-6]\.";

  location /{
      try_files $uri $uri/ @router;
      index index.html;
  }

  location @router{
      rewrite ^.*$ /index.html last;
  }

  # 代理转发
  location /api {
    proxy_pass http://127.0.0.1:8081/api/;
    proxy_set_header Host $host;
    proxy_set_header X-Real-IP $remote_addr;
    proxy_set_header X-Forwarded-For $proxy_add_x_forwarded_for;
  }
}
上述配置文件中,为了加快前端应用的访问,开启了 Nginx 的 GZip 压缩功能,配置如下:
gzip on;
gzip_min_length 10k;
gzip_comp_level 9;
gzip_types text/plain text/css application/javascript application/x-javascript text/javascript application/xml;
gzip_vary on;
gzip_disable "MSIE [1-6]\.";
代理转发
添加代理转发功能,以便于访问前端应用代理转发访问后端API接口地址,参数 proxy_pass 即代码转发的后端服务请求地址,其中 8081 为后端服务的端口。
更改配置后需要重启 Nginx 使其生效。
systemctl restart nginxSSL 证书阿里云官方提供了时长三个月的免费 SSL 证书,可以登录阿里云控制台去免费申请,进入控制台后打开 SSL证书管理 点击 个人测试证书。
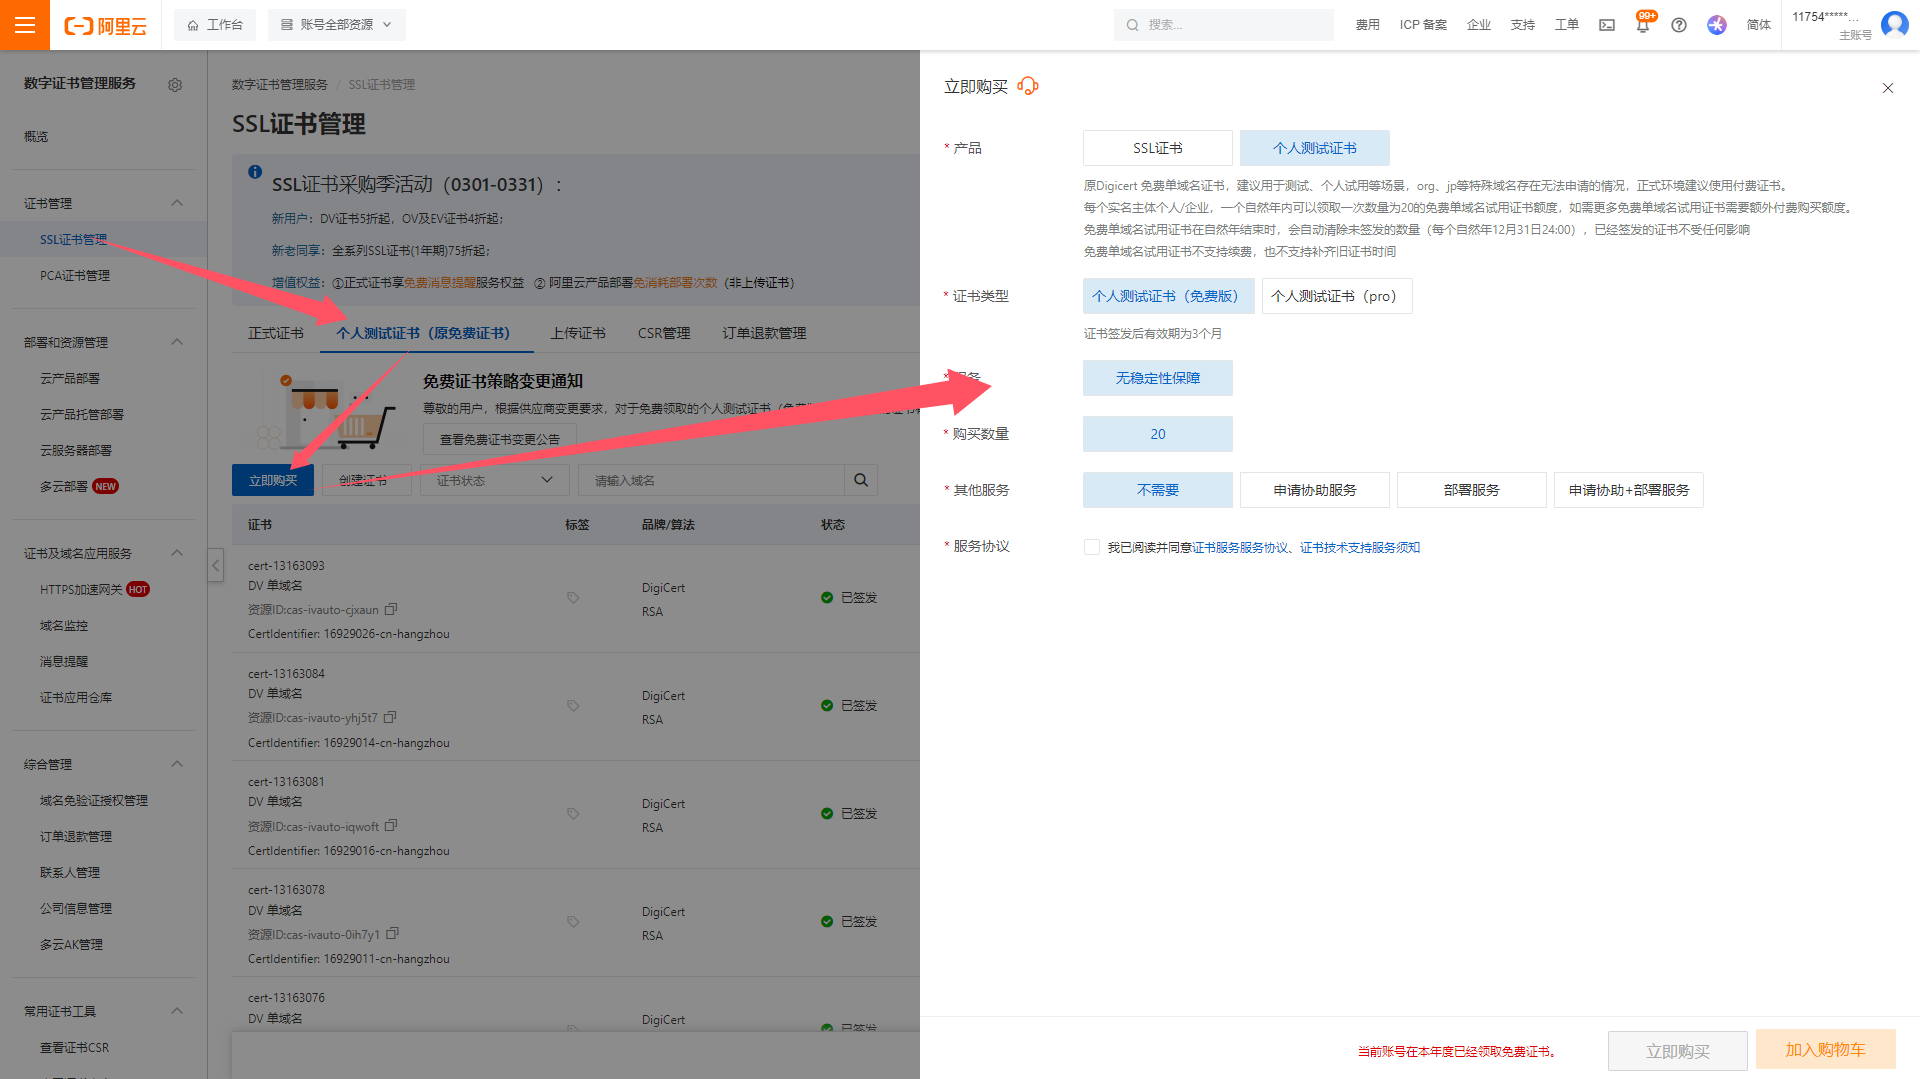
购买好免费证书后,点击 个人测试证书 => 创建证书,创建证书并审核。

待证书审核通过即可下载 nginx 版本的证书使用。
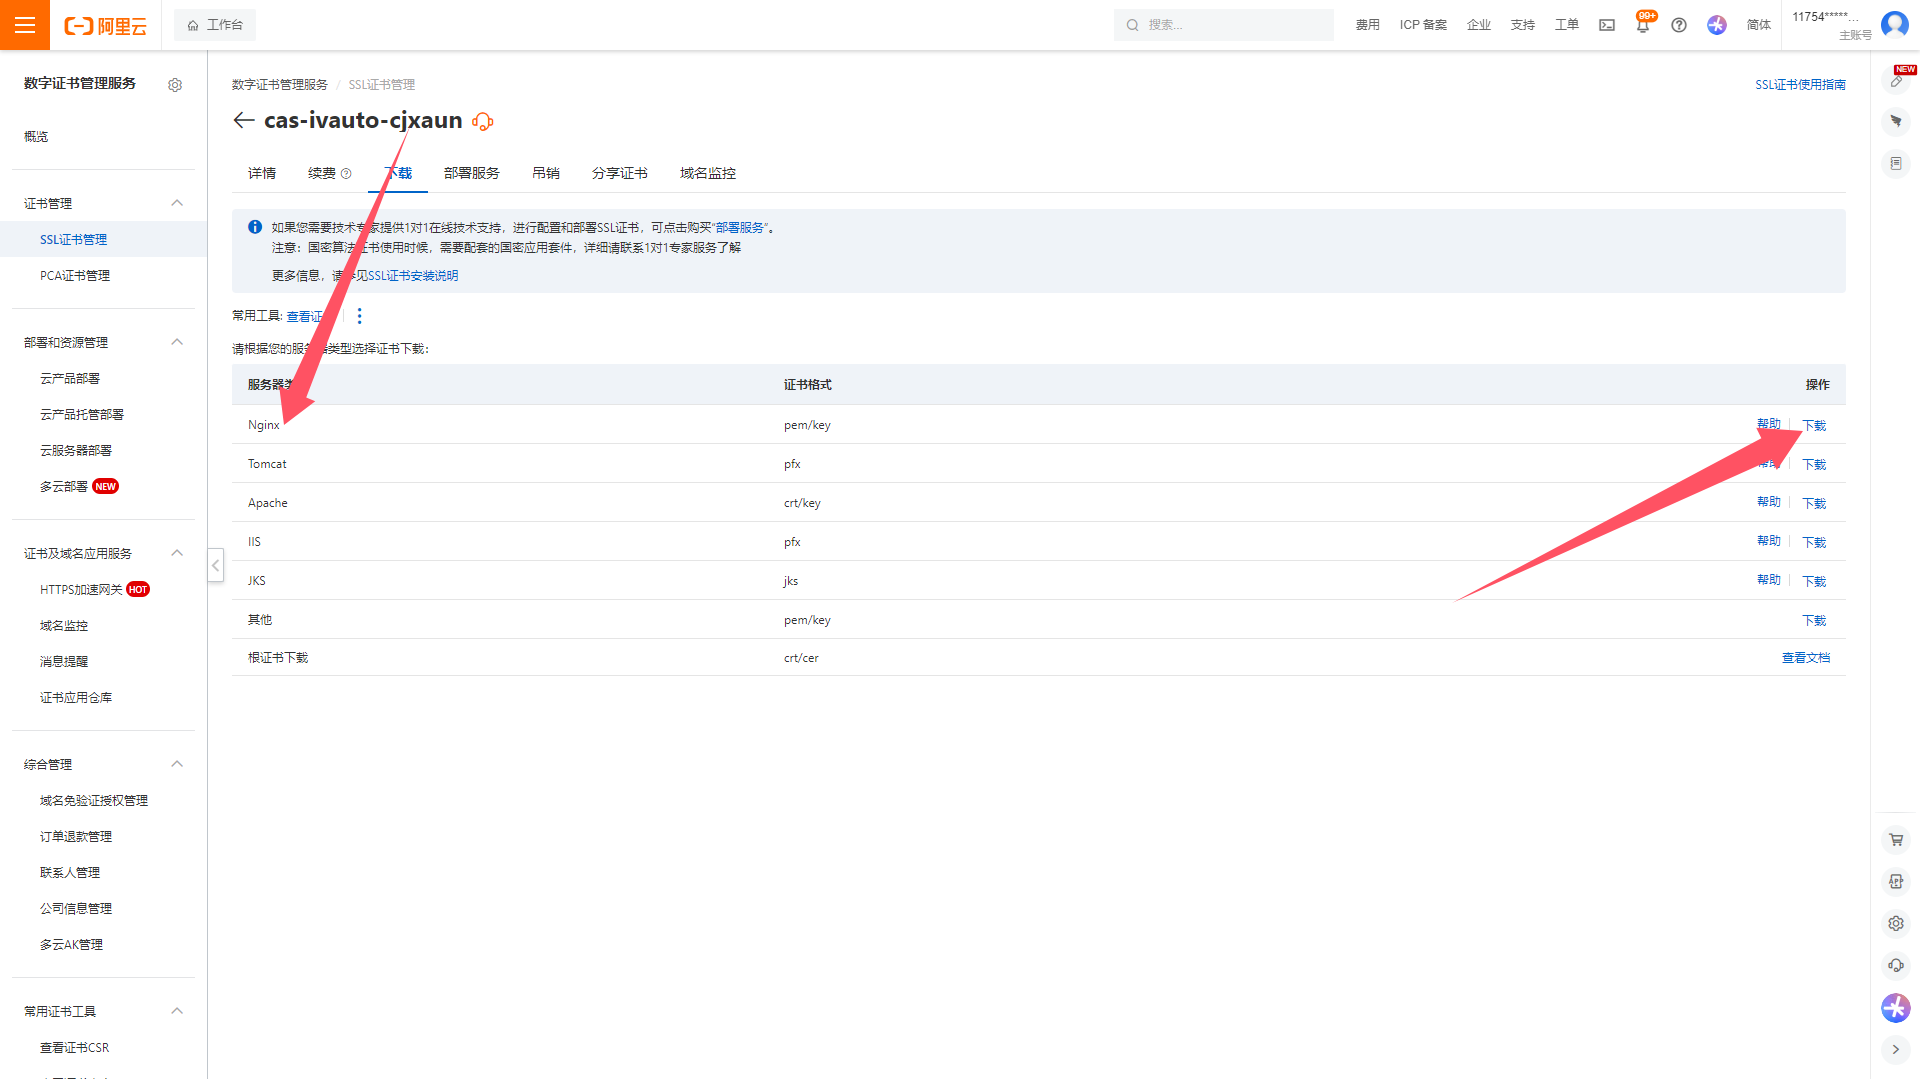
下载的 SSL 证书上传至 cert 证书努目录,以下是使用 SSL 证书配置的应用 nginx 配置案例:
server {
  listen 443 ssl;
  # 配置HTTPS的默认访问端口为443。
  # 如果未在此处配置HTTPS的默认访问端口,可能会造成Nginx无法启动。
  # 如果您使用Nginx 1.15.0及以上版本,请使用listen 443 ssl代替listen 443和ssl on。

  # 实际项目部署时此处的域名需要解析已备案过的域名
  server_name admin.example.com;

  # 实际项目部署时换成自己的实际路径
  root /usr/local/nginx/html/dist;

  # 开启Gzip功能
  gzip on;
  gzip_min_length 10k;
  gzip_comp_level 9;
  gzip_types text/plain text/css application/javascript application/x-javascript text/javascript application/xml;
  gzip_vary on;
  gzip_disable "MSIE [1-6]\.";

  location /{
      try_files $uri $uri/ @router;
      index index.html;
  }

  location @router{
      rewrite ^.*$ /index.html last;
  }

  # 证书配置
  ssl_certificate cert/admin.example.com.pem;  #需要将cert-file-name.pem替换成已上传的证书文件的名称。
  ssl_certificate_key cert/admin.example.com.key; #需要将cert-file-name.key替换成已上传的证书私钥文件的名称。
  ssl_session_timeout 5m;
  ssl_ciphers ECDHE-RSA-AES128-GCM-SHA256:ECDHE:ECDH:AES:HIGH:!NULL:!aNULL:!MD5:!ADH:!RC4;
  # 表示使用的加密套件的类型。
  ssl_protocols TLSv1 TLSv1.1 TLSv1.2; #表示使用的TLS协议的类型。
  ssl_prefer_server_ciphers on;

  # 代理转发
  location /api {
    proxy_pass http://127.0.0.1:8081/api/;
    proxy_set_header Host $host;
    proxy_set_header X-Real-IP $remote_addr;
    proxy_set_header X-Forwarded-For $proxy_add_x_forwarded_for;
  }
}
上述配置文件中,为了加快前端应用的访问,开启了 Nginx 的 GZip 压缩功能,配置如下:
gzip on;
gzip_min_length 10k;
gzip_comp_level 9;
gzip_types text/plain text/css application/javascript application/x-javascript text/javascript application/xml;
gzip_vary on;
gzip_disable "MSIE [1-6]\.";
代理转发
添加代理转发功能,以便于访问前端应用代理转发访问后端API接口地址,参数 proxy_pass 即代码转发的后端服务请求地址,其中 8081 为后端服务的端口。
更改配置后需要重启 Nginx 使其生效。
systemctl restart nginxSSL 证书腾讯云官方提供了时长三个月的免费 SSL 证书,可以登录阿里云控制台去免费申请,进入控制台后打开 我的证书 点击 免费证书。
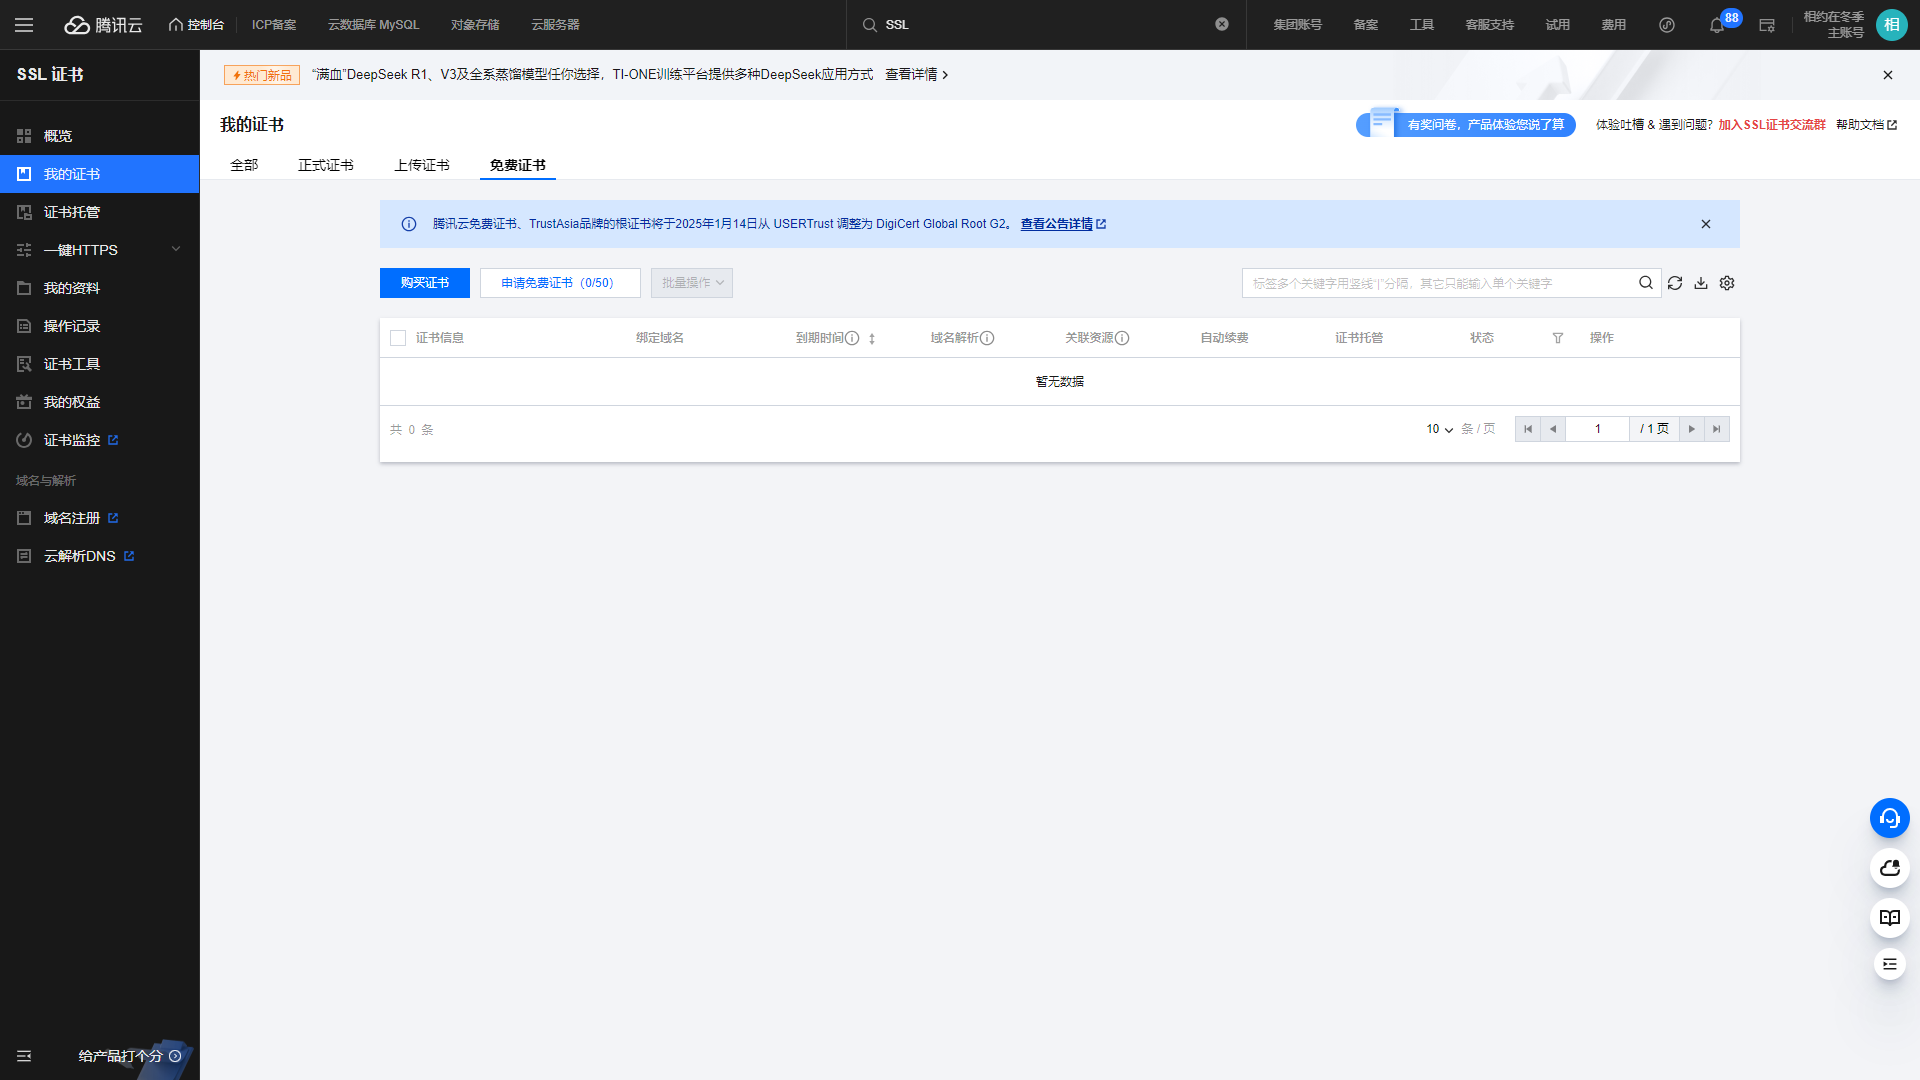
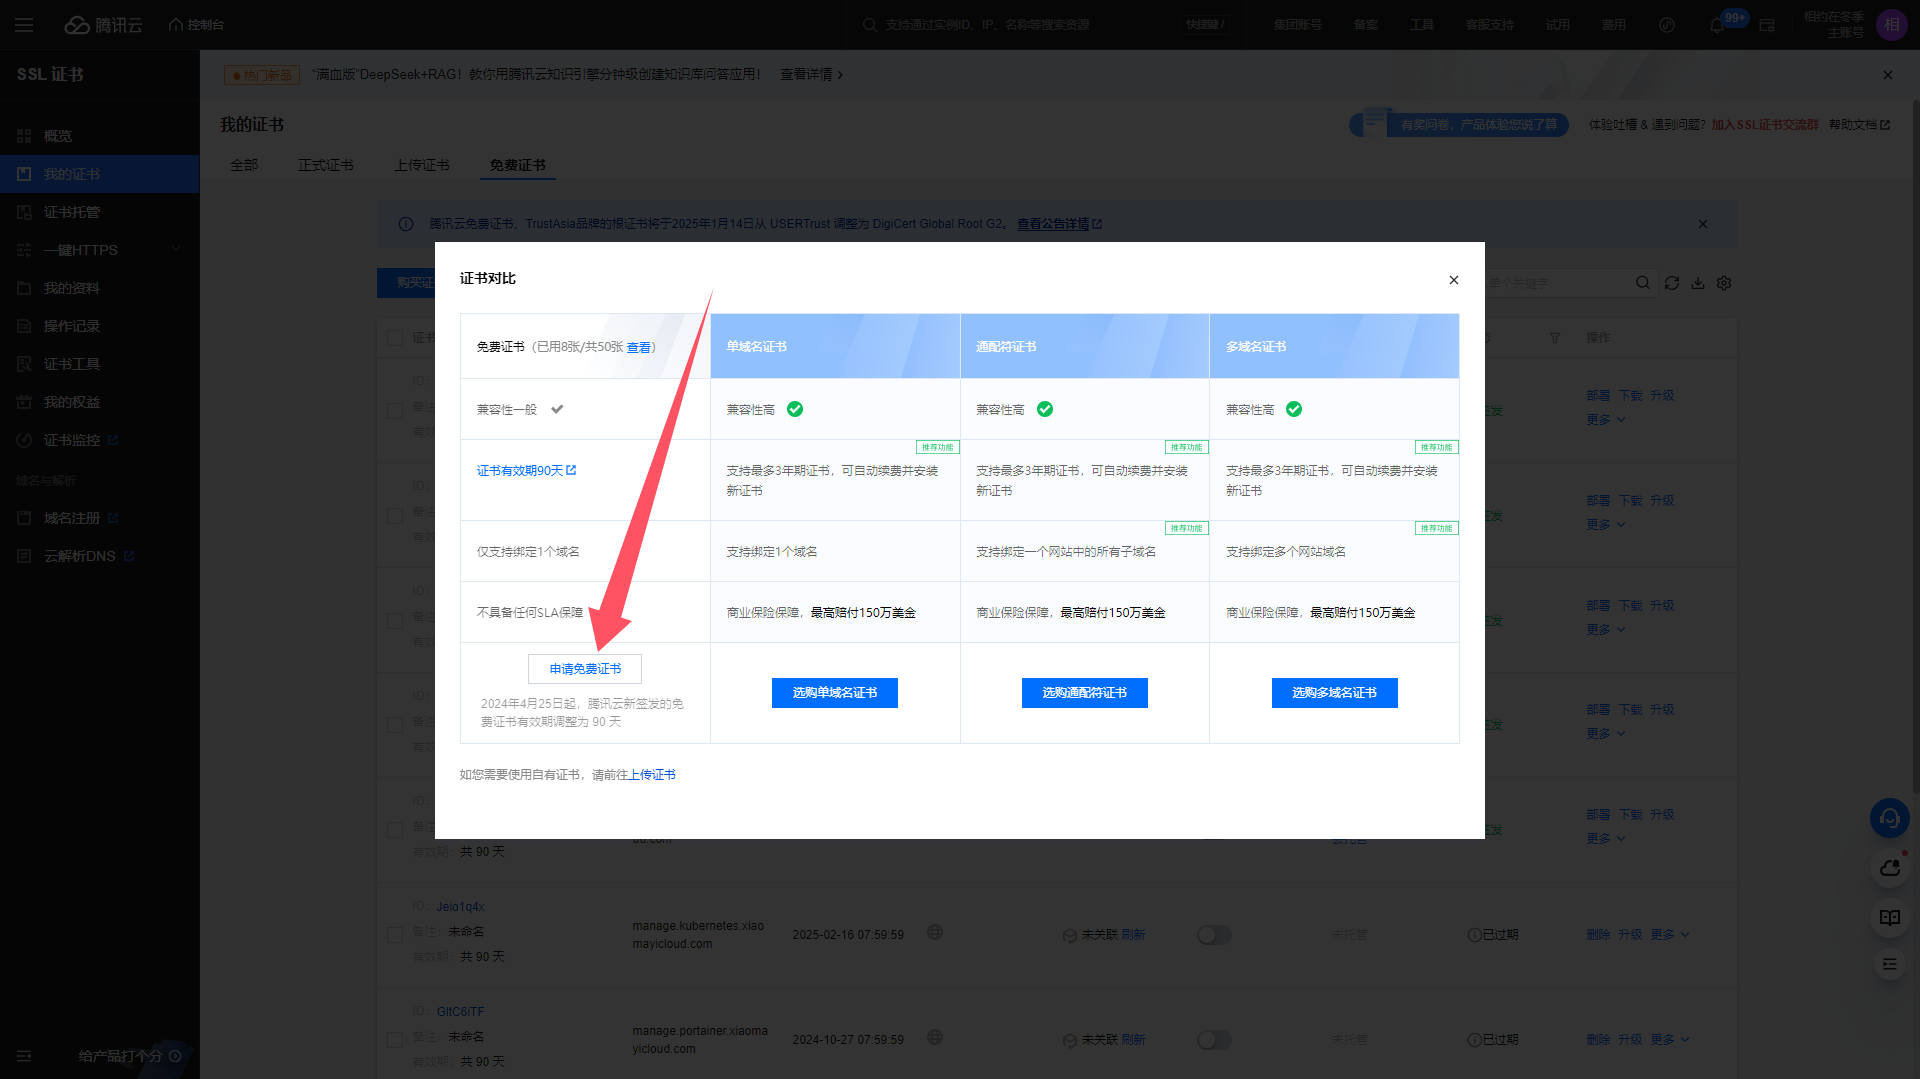
购买好免费证书后,点击 我的证书 => 申请免费证书与,创建证书并审核。
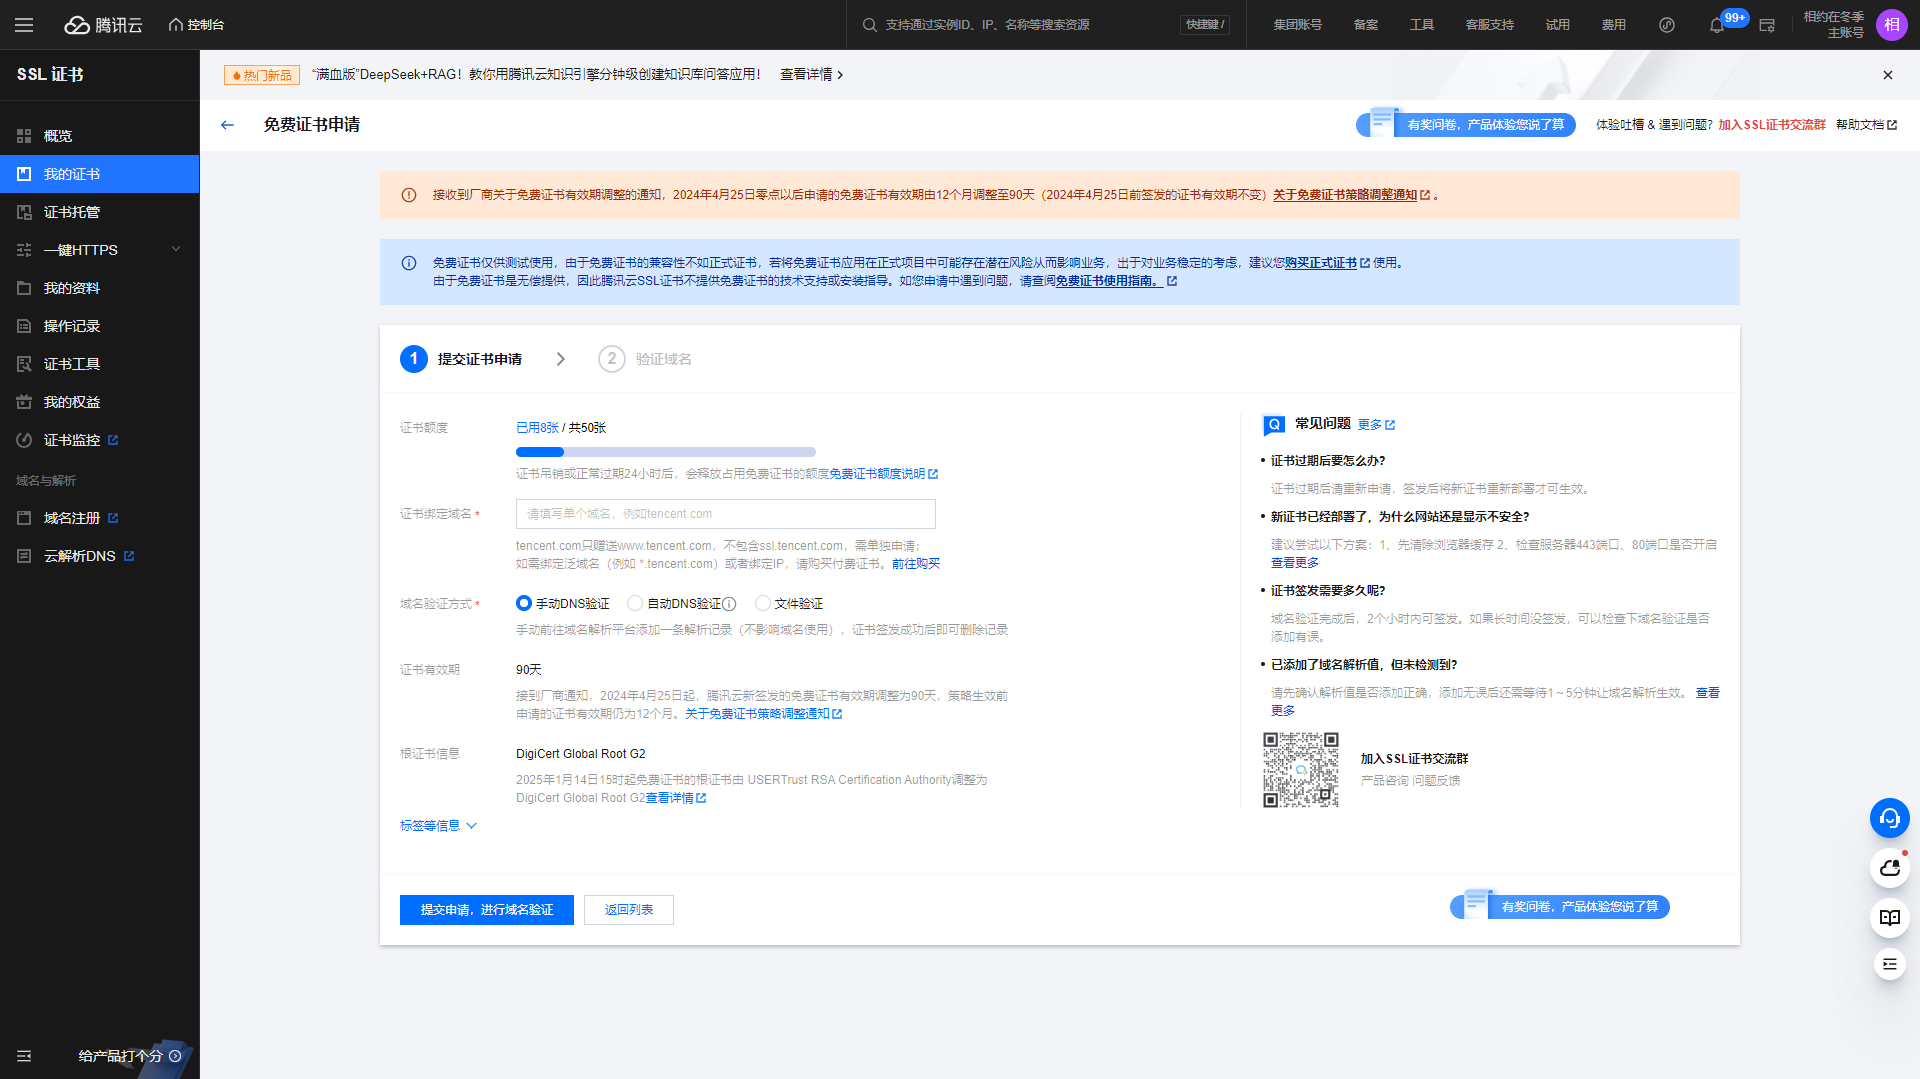
待证书审核通过即可下载 nginx 版本的证书使用。
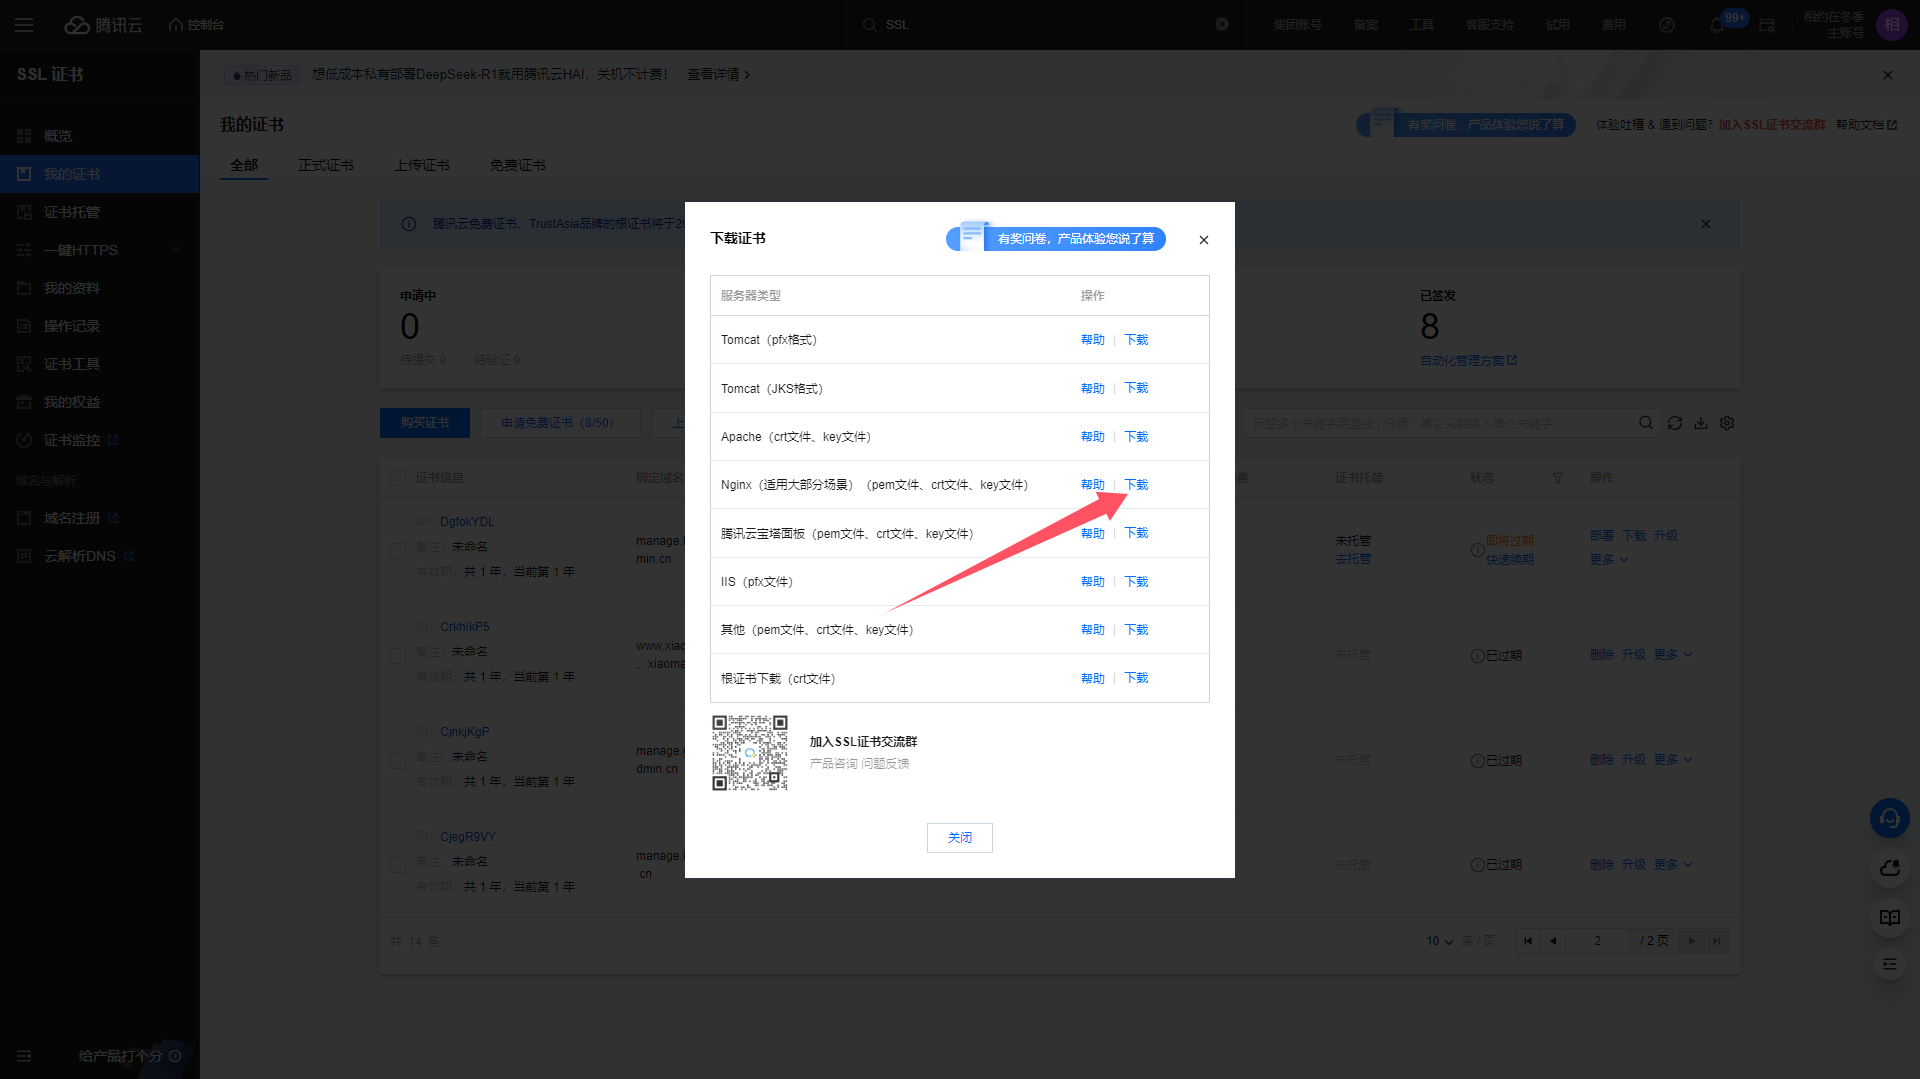
下载的 SSL 证书上传至 cert 证书努目录,以下是使用 SSL 证书配置的应用 nginx 配置案例:
server {
  listen 443 ssl;
  #配置HTTPS的默认访问端口为443。
  #如果未在此处配置HTTPS的默认访问端口,可能会造成Nginx无法启动。
  #如果您使用Nginx 1.15.0及以上版本,请使用listen 443 ssl代替listen 443和ssl on。

  # 实际项目部署时此处的域名需要解析已备案过的域名
  server_name admin.example.com;

  # 实际项目部署时换成自己的实际路径
  root /usr/local/nginx/html/dist;

  # 开启Gzip功能
  gzip on;
  gzip_min_length 10k;
  gzip_comp_level 9;
  gzip_types text/plain text/css application/javascript application/x-javascript text/javascript application/xml;
  gzip_vary on;
  gzip_disable "MSIE [1-6]\.";

  location /{
      try_files $uri $uri/ @router;
      index index.html;
  }

  location @router{
      rewrite ^.*$ /index.html last;
  }

  index index.html index.htm;
  #请填写证书文件的相对路径或绝对路径
  ssl_certificate cert/admin.example.com_bundle.crt;
  #请填写私钥文件的相对路径或绝对路径
  ssl_certificate_key cert/admin.example.com.key;
  ssl_session_timeout 5m;
  #请按照以下协议配置
  ssl_protocols TLSv1.2 TLSv1.3;
  #请按照以下套件配置,配置加密套件,写法遵循 openssl 标准。
  ssl_ciphers ECDHE-RSA-AES128-GCM-SHA256:HIGH:!aNULL:!MD5:!RC4:!DHE;
  ssl_prefer_server_ciphers on;

  location /api {
      proxy_pass http://127.0.0.1:8081/api/;
      proxy_set_header Host $host;
      proxy_set_header X-Real-IP $remote_addr;
      proxy_set_header X-Forwarded-For $proxy_add_x_forwarded_for;
  }
}
上述配置文件中,为了加快前端应用的访问,开启了 Nginx 的 GZip 压缩功能,配置如下:
gzip on;
gzip_min_length 10k;
gzip_comp_level 9;
gzip_types text/plain text/css application/javascript application/x-javascript text/javascript application/xml;
gzip_vary on;
gzip_disable "MSIE [1-6]\.";
代理转发
添加代理转发功能,以便于访问前端应用代理转发访问后端API接口地址,参数 proxy_pass 即代码转发的后端服务请求地址,其中 8081 为后端服务的端口。
更改配置后需要重启 Nginx 使其生效。
systemctl restart nginx生产环境部署好之后即可在浏览器输入网址 http://admin.example.com 访问访问系统。

访问域名成功显示上述界面即代表本地您的部署已经完成。
特别说明
如果您配置的是 SSL 证书访问,则访问地址是 https 开头,即 https://admin.example.com。